Have you noticed that your photos, especially portrait oriented photos, are missing a lot of the picture? Have you thought about the aspect ratio of your output video? Vegas adds photos to a video track in a "crop to fill" manner, that means it will try to fill the output video frame with image data, even if a photo needs to be cropped to do so. For example this photo of three girls has a 3:2 aspect ratio. If it is placed into a Vegas project that has the "NTSC DV Widescreen" template set it will be cropped on the top and bottom to fit the 16:9 aspect ratio.

Original 3:2 aspect ratio photo
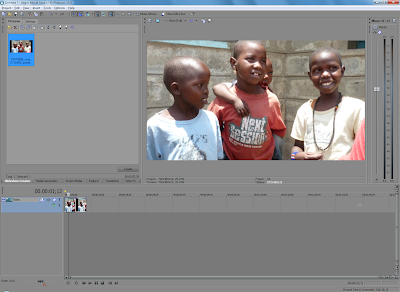
3:2 aspect ratio photo added to a widescreen DVD project, the photo is cropped at the top and bottom
The screen capture below of the pan and crop tool shows how the original photo has been cropped. The tool can be used to manually "zoom out" and remove the cropping, but if there are a large number of photos in the slideshow doing that takes a long time.
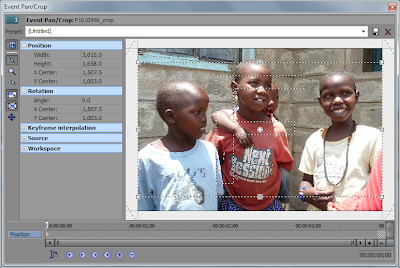
3:2 aspect ratio photo cropped to widescreen DVD project shown in the pan and crop tool, dotted lines show the photo cropped at the top and bottom
The solution is to pad the images before importing them using the Slideshow Creator. When the photos are padded so that the resulting images have the same aspect ratio as the output video frame they will not be cropped. My personal preference is also to resize the images so that they have the same dimensions as the output video frame. This is all straight forward unless the images will be used in a widescreen DVD video. The frames of a widescreen DVD video have the dimensions 720x480 pixels, however the widescreen format is anamorphic, and the image displayed on screen will have the dimensions 873x480. So when padding photos for a widescreen DVD the dimensions of the padded image are 873x480.

Original 3:2 aspect ratio photo padded to 873x480 pixels
Photos can be padded and resized using any number of image editing tools. Irfanview can be used to resize the images, then in its Thumbnail viewer index prints can be created with one photo per page, no borders or image information, with the page size set to the dimensions of the output video frame. It's also possible to choose the color that will be used to pad the photos. Other applications can also be used to create the padded images including the use of Actions in Photoshop or scripts in Gimp. Once the images are padded they can be used as input to the slide-show.

3:2 aspect ratio photo with padding added to a widescreen DVD project, the photo is not cropped
The pan and crop tool shows that the image is no longer cropped.

Photo shown in the pan and crop tool has no cropping by default.
Of course whether your images are cropped or have padding is a personal preference. If you don't mind losing image data then accept the default crop or use the pan and crop tool to select the part of the photo that should be visible. However there is a glitch if you are going to output your video in different formats, like widescreen DVD and Blu-Ray. The aspect ratio of whichever Template is set on the project when the slideshow is created will be used to crop the photos when the Template is changed. The images below show the original photo added to a project with the "NTSC DV Widescreen" Template selected. Then the project template was changed to "HDV 720-30p". Now the photo is cropped at the top and bottom and padded at the top and bottom, this is the worst possible outcome.
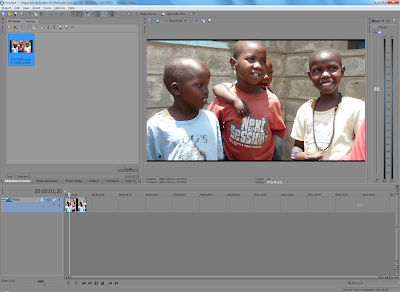
Photo added to widescreen DVD project, then project changed to HD 720. Top and bottom of the photo are now cropped and padded
The pan and crop window shows what has happened, the frame being used to crop the photo has the widescreen DVD aspect ratio, the HD aspect ratio is not the same, so now the photo is cropped, then padded. The frame aspect ratio can be reset to the HD aspect ratio using the "Preset" list at the top of the window.
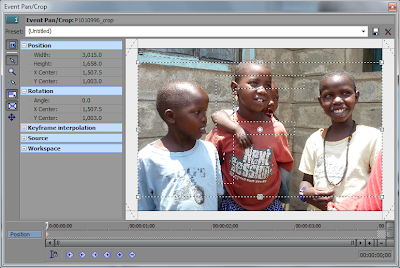
Photo added to widescreen DVD project, then project changed to HD 720. Top and bottom of the photo are now cropped and padded
The photo padded for widescreen DVD now has padding on all sides.
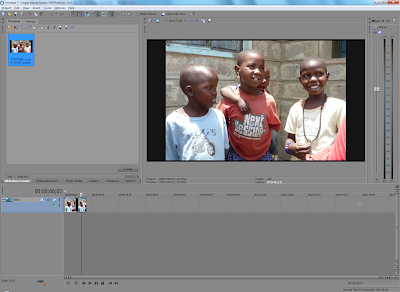
Photo padded for a widescreen DVD project has had the project changed to HD 720. All sides of the photo are now padded
So when creating a slideshow where it is desirable to see the whole photo the best practices are: resize the photos to fit into the output video frame, if necessary pad the photos so that they have the same dimensions as the output video frame, create image files from the photos that match the output video frame size (i.e. don't use images created for a Blu-Ray slide show in a widescreen DVD slideshow).
But there is still so much more about slideshows to discuss, like markers, color correction, and pan and crop; those will all have to wait for a future post.
No comments:
Post a Comment