Showing posts with label Sony. Show all posts

Sunday, July 22, 2012

When Canon G1X video and Sony Vegas collide

Do you end up with periodic black frames followed by bright ones when editing video from Canon's G1X camera using Sony Vegas Movie Studio 10? If so try re-encoding the camera generated MOV files using Huffyuv (which is lossless) before editing them in Vegas.

Canon's G1X camera is capable of capturing H.264 encoded video and storing it in an MOV file. The video captured is 1920x1080 at 23.976 frames per second (you can read about this not quite 24fps if you're interested).

I had no problem opening the video files in Sony Vegas and working with them in any of the tools. For my initial test I simply stacked up a few short clips directly from the camera and started the render to H.264 process. In playback the first minute or so of the rendered video was fine but eventually a black frame was inserted into the middle of a clip, not at a transition, and bright frames followed it for a second or so before normal brightness slowly returned. Over the course of my five minute video this happened several times.

I decided to avoid using the H.264 encoded camera input by using ffmpeg to convert the camera video to Huffyuv encoded video since this would give me lossless video to experiment with. (And now a little detour getting the Huffyuv codec installed on my Windows 7 system so that it would be available for Vegas.) Once that was done I opened the Huffyuv video using Vegas in the same order that I had done before with the camera video and rendered to H.264. This time the resulting video played back without any defects.

It appears to me that Sony Vegas is not really capable of handling the 23.976 frame rate properly when working with H.264 encoded 1920x1080 input and periodically inserts a black frame during the output render. When the output is then H.264 encoded the black frame affects the compression of following frames, making them brighter.

The summary: Canon G1X video should be converted to a lossless encoding (Huffyuv works fine) before being edited on Sony Vegas 10. Other versions of Vegas may or may not need the same treatment.

Sunday, December 5, 2010

Loopy DVD Menu Videos

My first DVD using Sony's DVD Architect has a video background for the menus. Being reckless I started creating the video for the menu before learning anything about DVD Architect (DA). I had my video fade up from black at the start and fade down to black at the end. In DA I added the video as the background media then previewed it. The video played and as I anticipated it looped back to the beginning and started again. Seeing this I had an epiphany; if I added a final transition at the end so that the last frame of the video was identical to the first frame at the beginning of the video it would appear as if the menu video was an endless loop. This was quickly followed up with another thought, "Video loops just like every professional DVD menu - doh!" I went back and re-edited and re-rendered my video for looping. In the DA preview I noticed a choppy gap as the video looped but convinced myself it was just an artifact of the preview, the final DVD would be fine.

Later when I watched the actual DVD I saw the choppy transition still existed. At that point I had been working on the DVD and its contents for months and my interest in solving (if it was even possible) a minor issue was very low.

Then recently I happened to be watching the main menu on the documentary "Good Hair" and noticed that when it reached the end of the video there was a brief transition to what appeared to be a different resolution still image of the main menu, then the video started playing again. That got me thinking about the loop transition on my DVD. It turns out that the main reason the loop was choppy was because the length of the menu video was calculated incorrectly.

On the Menu Page Properties under General is an entry for Menu length, the default value is Auto calculate and the length it has calculated is in the read only entry Length just below.

The Menu Page Properties with Auto calculate selected.

In the case of my video the calculated length was about 0.2 second longer than the actual video and this seemed to cause problems during playback. The solution was to set the actual length of the video manually. The actual length of the video can be found in the lower right of the Timeline pane, however the length is shown in seconds and frames. This not entirely helpful because the time to be entered in Length must be in minutes, seconds, and milliseconds. To get the time make sure that the media timeline pane is showing; from the menu select View - Timeline. In the time bar above the video right-click and select Time and Frames.
Changing the display to Time and Frames in the Timeline.

Zoom in on the timeline so that a hash mark appears for each frame, now click to place the cursor at the last frame you want to show which is probably the last frame. Now right click the timeline bar again and select Time. The length of the video is shown on the left side of the pane right above the video.
Set the display to Time and the actual video length is shown.

Return to the menu properties and click on Auto calculate and a list appears; choose Specify. Now the video time determined above should be copied to the Length value.
Specify the actual video length.

Preview the menu and you should find that it loops seamlessly from the end of the video back to the beginning. I don't understand why the estimated length doesn't match the actual length, guesses include: slight discrepancies between the audio and the video (i.e. the audio track is longer), the data used to calculate the length is bad or the calculation formula is wrong. In any case it seems easy enough to correct to create professional looking menus with video backgrounds.

I learned a few other interesting possibilities during this exercise. One is that the loop point defines the beginning of the loop, this is how some menu videos have an introductory part that is only shown once along with a location to start loop playback so that there is a seamless loop. Another possibility is that when navigating from menu to menu a "transition video" can be inserted between them. When a viewer selects a button, instead of navigating immediately to the next menu the link connects to a video that has been placed at the root of the DVD file structure. The End Action of the transition video then links to the menu to be displayed. This is a fairly common technique I have seen on several of the more highly produced DVDs.

Wednesday, November 10, 2010

Of Photo and Video Aspect Ratios (Surviving Vegas Movie Studio 10)

Creating "slideshows" of still photos for a video using Sony Vegas seems straightforward: round up some images using the Slideshow Creator, click the "Create" button and a slideshow appears in a video track. If only it were that simple.

Have you noticed that your photos, especially portrait oriented photos, are missing a lot of the picture? Have you thought about the aspect ratio of your output video? Vegas adds photos to a video track in a "crop to fill" manner, that means it will try to fill the output video frame with image data, even if a photo needs to be cropped to do so. For example this photo of three girls has a 3:2 aspect ratio. If it is placed into a Vegas project that has the "NTSC DV Widescreen" template set it will be cropped on the top and bottom to fit the 16:9 aspect ratio.

Original 3:2 aspect ratio photo
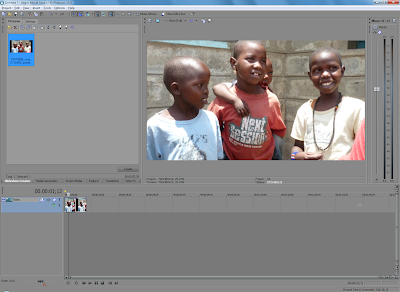
3:2 aspect ratio image added to widescreen DVD project
3:2 aspect ratio photo added to a widescreen DVD project, the photo is cropped at the top and bottom

The screen capture below of the pan and crop tool shows how the original photo has been cropped. The tool can be used to manually "zoom out" and remove the cropping, but if there are a large number of photos in the slideshow doing that takes a long time.
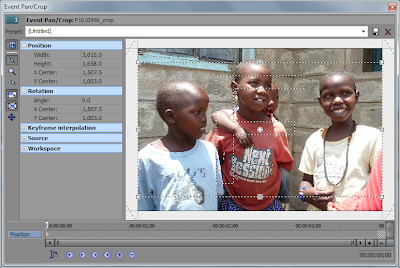
3:2 aspect ratio photo cropped to widescreen DVD project shown in the pan and crop tool, dotted lines show the photo cropped at the top and bottom

The solution is to pad the images before importing them using the Slideshow Creator. When the photos are padded so that the resulting images have the same aspect ratio as the output video frame they will not be cropped. My personal preference is also to resize the images so that they have the same dimensions as the output video frame. This is all straight forward unless the images will be used in a widescreen DVD video. The frames of a widescreen DVD video have the dimensions 720x480 pixels, however the widescreen format is anamorphic, and the image displayed on screen will have the dimensions 873x480. So when padding photos for a widescreen DVD the dimensions of the padded image are 873x480.
Original 3:2 aspect ratio photo padded to 873x480 pixels

Photos can be padded and resized using any number of image editing tools. Irfanview can be used to resize the images, then in its Thumbnail viewer index prints can be created with one photo per page, no borders or image information, with the page size set to the dimensions of the output video frame. It's also possible to choose the color that will be used to pad the photos. Other applications can also be used to create the padded images including the use of Actions in Photoshop or scripts in Gimp. Once the images are padded they can be used as input to the slide-show.
3:2 aspect ratio photo with padding added to a widescreen DVD project, the photo is not cropped

The pan and crop tool shows that the image is no longer cropped.
Photo shown in the pan and crop tool has no cropping by default.

Of course whether your images are cropped or have padding is a personal preference. If you don't mind losing image data then accept the default crop or use the pan and crop tool to select the part of the photo that should be visible. However there is a glitch if you are going to output your video in different formats, like widescreen DVD and Blu-Ray. The aspect ratio of whichever Template is set on the project when the slideshow is created will be used to crop the photos when the Template is changed. The images below show the original photo added to a project with the "NTSC DV Widescreen" Template selected. Then the project template was changed to "HDV 720-30p". Now the photo is cropped at the top and bottom and padded at the top and bottom, this is the worst possible outcome.
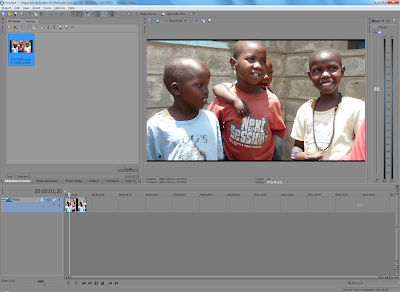
Photo added to widescreen DVD project, then project changed to HD 720. Top and bottom of the photo are now cropped and padded

The pan and crop window shows what has happened, the frame being used to crop the photo has the widescreen DVD aspect ratio, the HD aspect ratio is not the same, so now the photo is cropped, then padded. The frame aspect ratio can be reset to the HD aspect ratio using the "Preset" list at the top of the window.
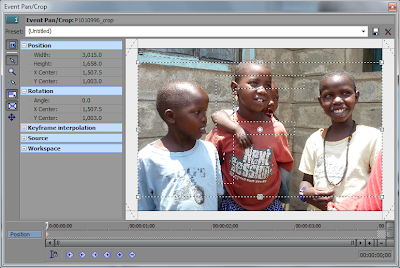
Photo added to widescreen DVD project, then project changed to HD 720. Top and bottom of the photo are now cropped and padded

The photo padded for widescreen DVD now has padding on all sides.
Photo added to widescreen DVD project, then project changed to HD 720. Top and bottom of the photo are now cropped and padded
Photo padded for a widescreen DVD project has had the project changed to HD 720. All sides of the photo are now padded

So when creating a slideshow where it is desirable to see the whole photo the best practices are: resize the photos to fit into the output video frame, if necessary pad the photos so that they have the same dimensions as the output video frame, create image files from the photos that match the output video frame size (i.e. don't use images created for a Blu-Ray slide show in a widescreen DVD slideshow).

But there is still so much more about slideshows to discuss, like markers, color correction, and pan and crop; those will all have to wait for a future post.